- Build multi-step pipelines visually — prompt, image, video, audio, upscaling — all connected in one flow
- Run your entire pipeline in one click from any root node
- Smart caching: only changed nodes re-execute — iteration is fast and credit-efficient
- Batch multiple prompts or reference images to generate dozens of assets in a single run
- Brand kit @mentions in prompt nodes resolve automatically — consistency is structural
- Flows has its own dedicated space, accessible from the homepage or projects list. No extra setup required.
- Available on all plans at no extra cost
Building AI video content is still mostly manual. You generate one asset, move to the next, re-enter your prompts, re-select your references, repeat. Each brief is a rebuild. Each new market means another session. The process doesn't scale.
What a Flow Is Made Of
A Flow is a visual pipeline built on a canvas, where each node represents a step in the process: a prompt, image generation, video generation, audio upload or upscaling. Connect them, set your inputs, and run the entire sequence in a single click.
Flows cover the full production stack. You can start with prompt nodes (including optional @mentions for brand kit elements), generate images and videos with different models, and finish with upscaling, all within the same workflow.
What makes Flows powerful is its flexibility. You can batch multiple inputs to generate many assets at once, or branch into different creative directions and compare them side by side. With smart caching, only the parts you change will rerun, while everything else stays as is, making iteration faster and more efficient.
Why Flows?
Professional teams generating AI content today still do it manually. One asset, one run, one rebuild per campaign. The tools are capable, but the bottleneck is the process. Every new brief means starting over: re-entering prompts, re-selecting references, re-running the same sequence you ran last time.
Flows removes the rebuild. Build a pipeline once, with the prompts, the references, the generation sequence, the upscaling, and every new brief runs through it. The creative logic is encoded in the Flow itself. Changing a script means updating one node, not rebuilding from scratch. Running five markets means running one Flow with multiple nodes, not five separate sessions.
For brand studios, the consistency gain is structural rather than prompt-dependent. Brand kit @mentions are baked into the pipeline. Characters, visual style, and product objects resolve automatically in every generation, not because someone remembered to include them, but because the Flow requires them.
For agencies and production teams, the scale math shifts entirely. What previously took an afternoon of manual generation can run instantly, in one click. The team's time moves from repetitive execution to creative decision-making: building the Flow, reviewing the results, directing what changes.
How Flows Fits Inside LTX Studio
Flows lives inside every LTX Studio project, becoming a natural part of the creative workflow. There's no need to switch tools or set anything up. It's all built into the same environment where your work already happens.
The canvas preserves every run. You can revisit previous results, rerun what worked, and tweak only what didn't without losing progress between iterations.
Flows isn't a separate product. It works alongside Gen Space, Canvas, Editing Space, and the Editor, connecting everything into one continuous production system.
Step-by-Step Walkthrough
Step 1: Open Flows in Your Project

Inside your LTX Studio project, click the Flows tab in the project navigation. If you haven't built a Flow yet, you'll land on an empty canvas.
Step 2: Add Your First Node
Right-click anywhere on the canvas to open the node picker. You can also click the + button in the toolbar. Start with a Text Prompt node — this is where your generation begins.
- Search for "Text Prompt" in the picker and click to place it
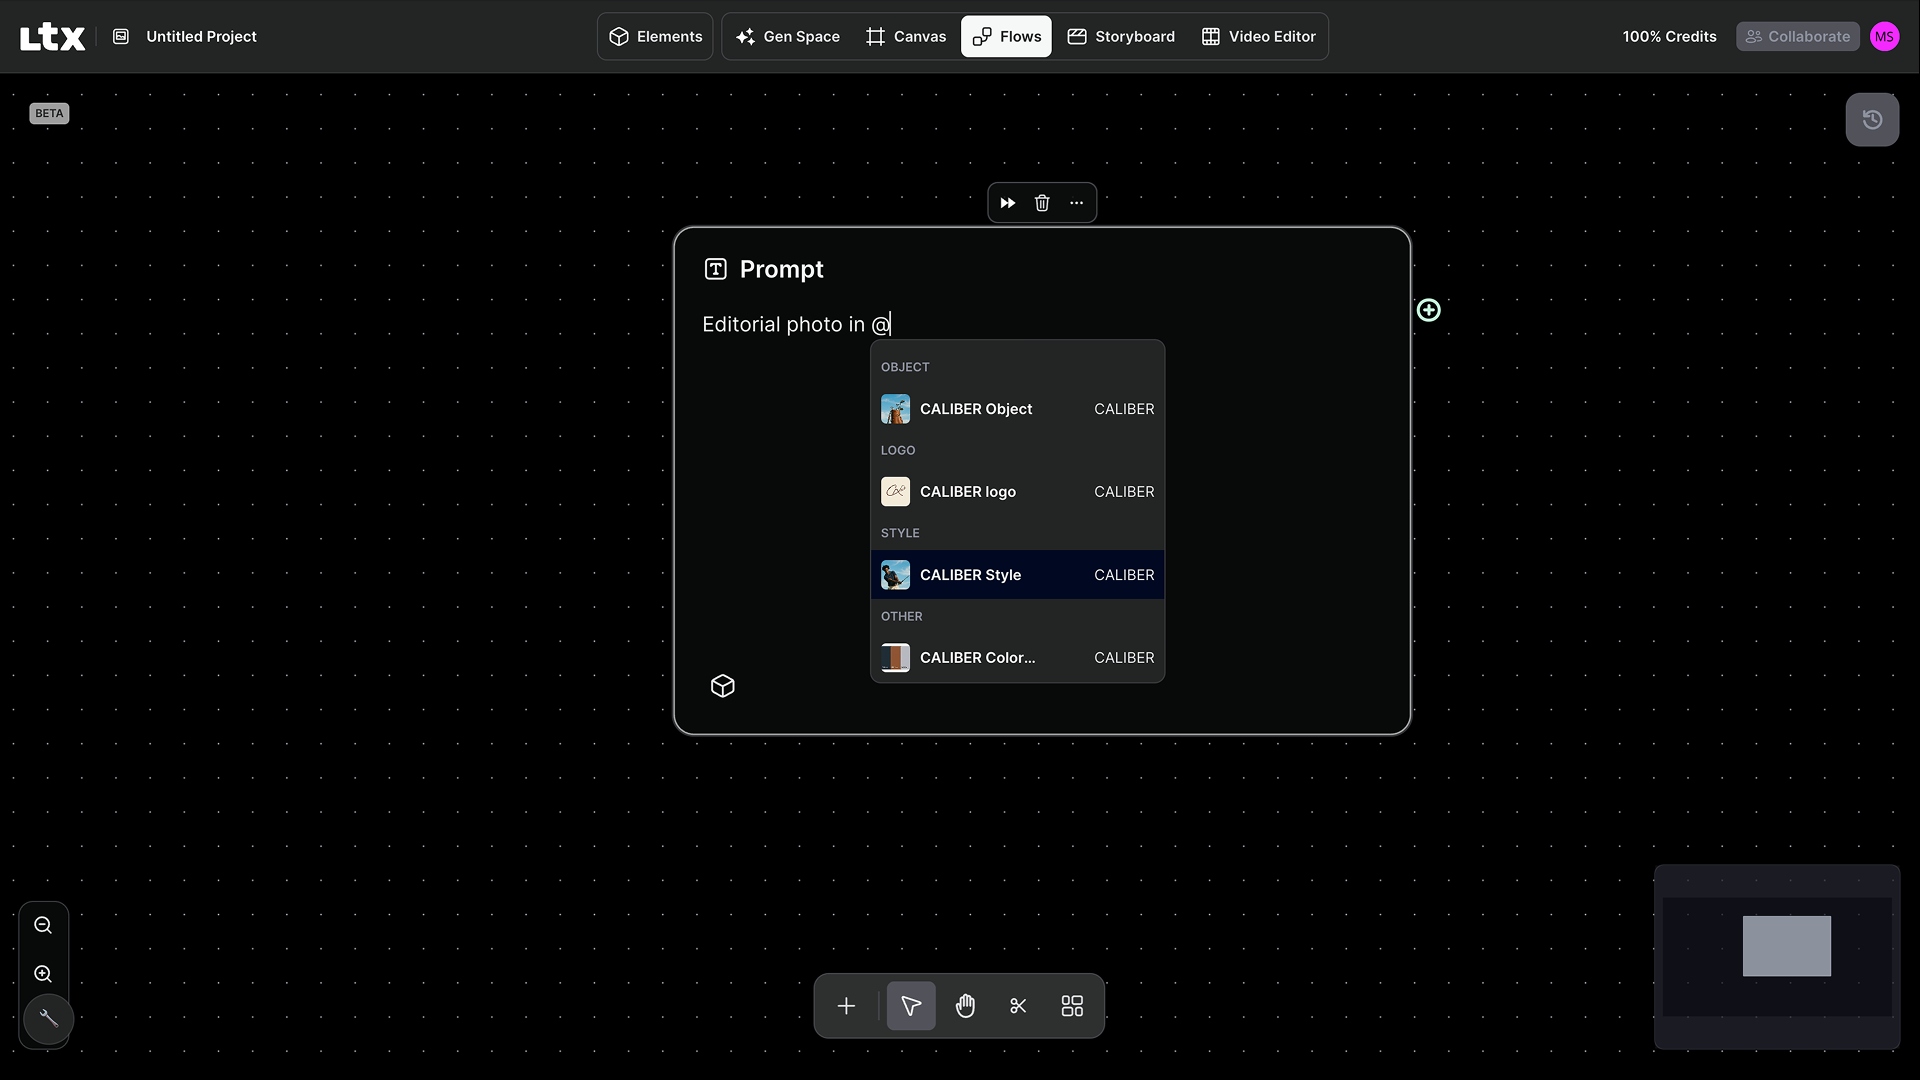
- Click the node and type your prompt
- Optional: Use @mentions to reference brand kit characters, styles, or objects
Tip: If you want to run across multiple prompts at once, use a Prompt Iterator node instead — add all your variations as a list and each becomes a separate batch item.
Step 3: Connect an Image Generation Node

Drag an edge from the output port of your Text Prompt node onto the canvas. The node picker opens pre-filtered to compatible types — select an image generation model (Z-Image, Nano Banana Pro, or Flux 2 Pro).
- Connect your Text Prompt output to the text input port of the image node
- Set resolution and outputs per run (1–4)
- Optional: Connect an Image Upload node to the reference port to guide the visual output
Step 4: Add a Video Generation Node
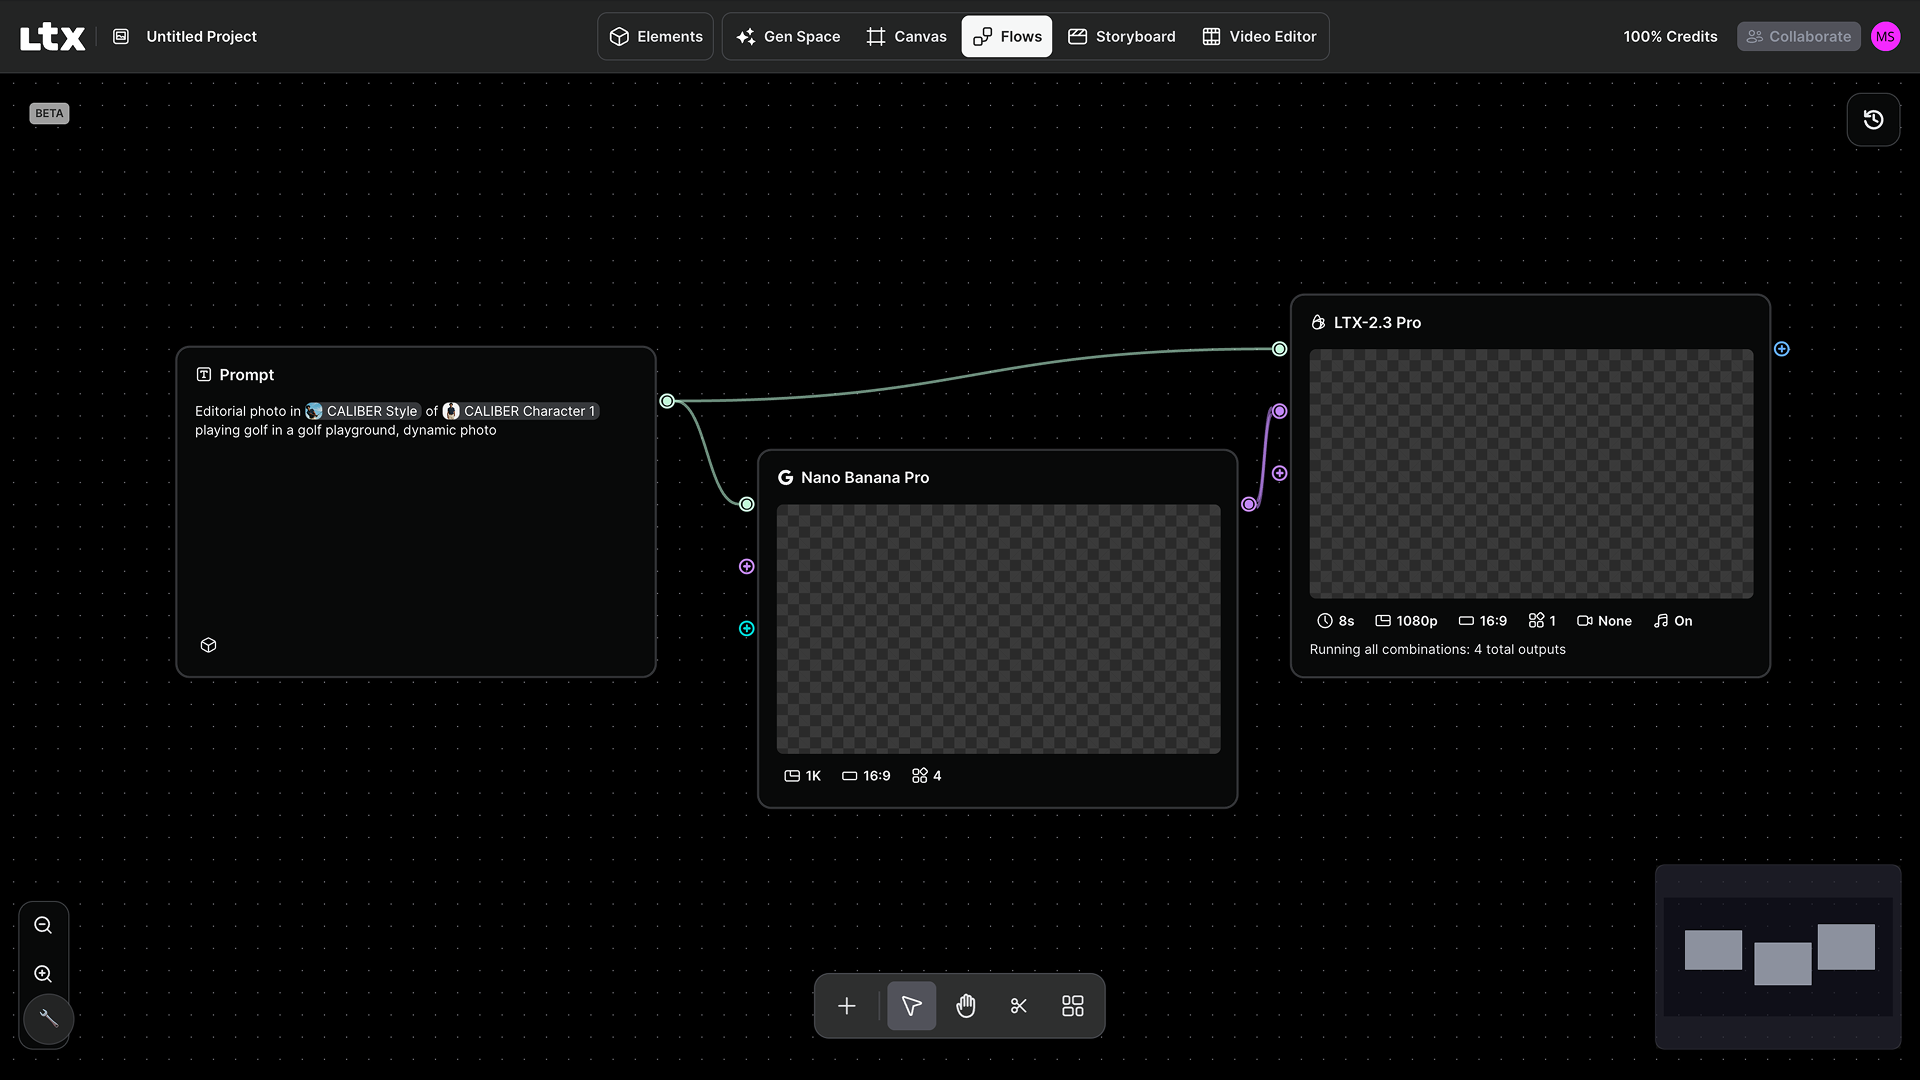
Drag from the image node's output to open the picker again, and select a video generation model. The image output connects to the start frame input — automatically putting it in image-to-video mode.
- Select your model (LTX-2 Pro, LTX-2 Fast, LTX-2.3 Pro/Fast, Veo 3.1, Kling 2.6 Pro)
- Set duration, aspect ratio, and camera motion where available
- Set outputs per run — up to 4 per node
Tip: LTX-2 Pro and LTX-2 Fast include 8 camera motion presets — useful for a consistent camera signature across batch outputs.
Step 5: Add an Upscaling Node (Optional)

Drag from the video node's output and add a Video Upscale (Topaz) node. Set your target resolution: 1080p, 4K, or 8K.
Step 6: Run Your Flow
Hover over your root node (the one with no inputs). A floating action bar appears — click Run workflow to execute the entire pipeline.
- Progress appears on each node: queued → processing → completed
- Results appear progressively as each generation finishes
- Nodes at the same level execute in parallel
- A Stop button appears during execution if you need to cancel
Step 7: Iterate with Smart Caching
Update your Text Prompt node and run again. Unchanged nodes instantly reuse their previous results — only nodes whose inputs changed will re-execute.
- Changed your prompt → image and video regenerate
- Changed only video settings → only video and upscaling regenerate
- Force re-run a specific node from its floating action bar
Tip: Cache works across sessions — come back the next day and unchanged nodes still have their results ready.
Step 8: Scale to a Batch
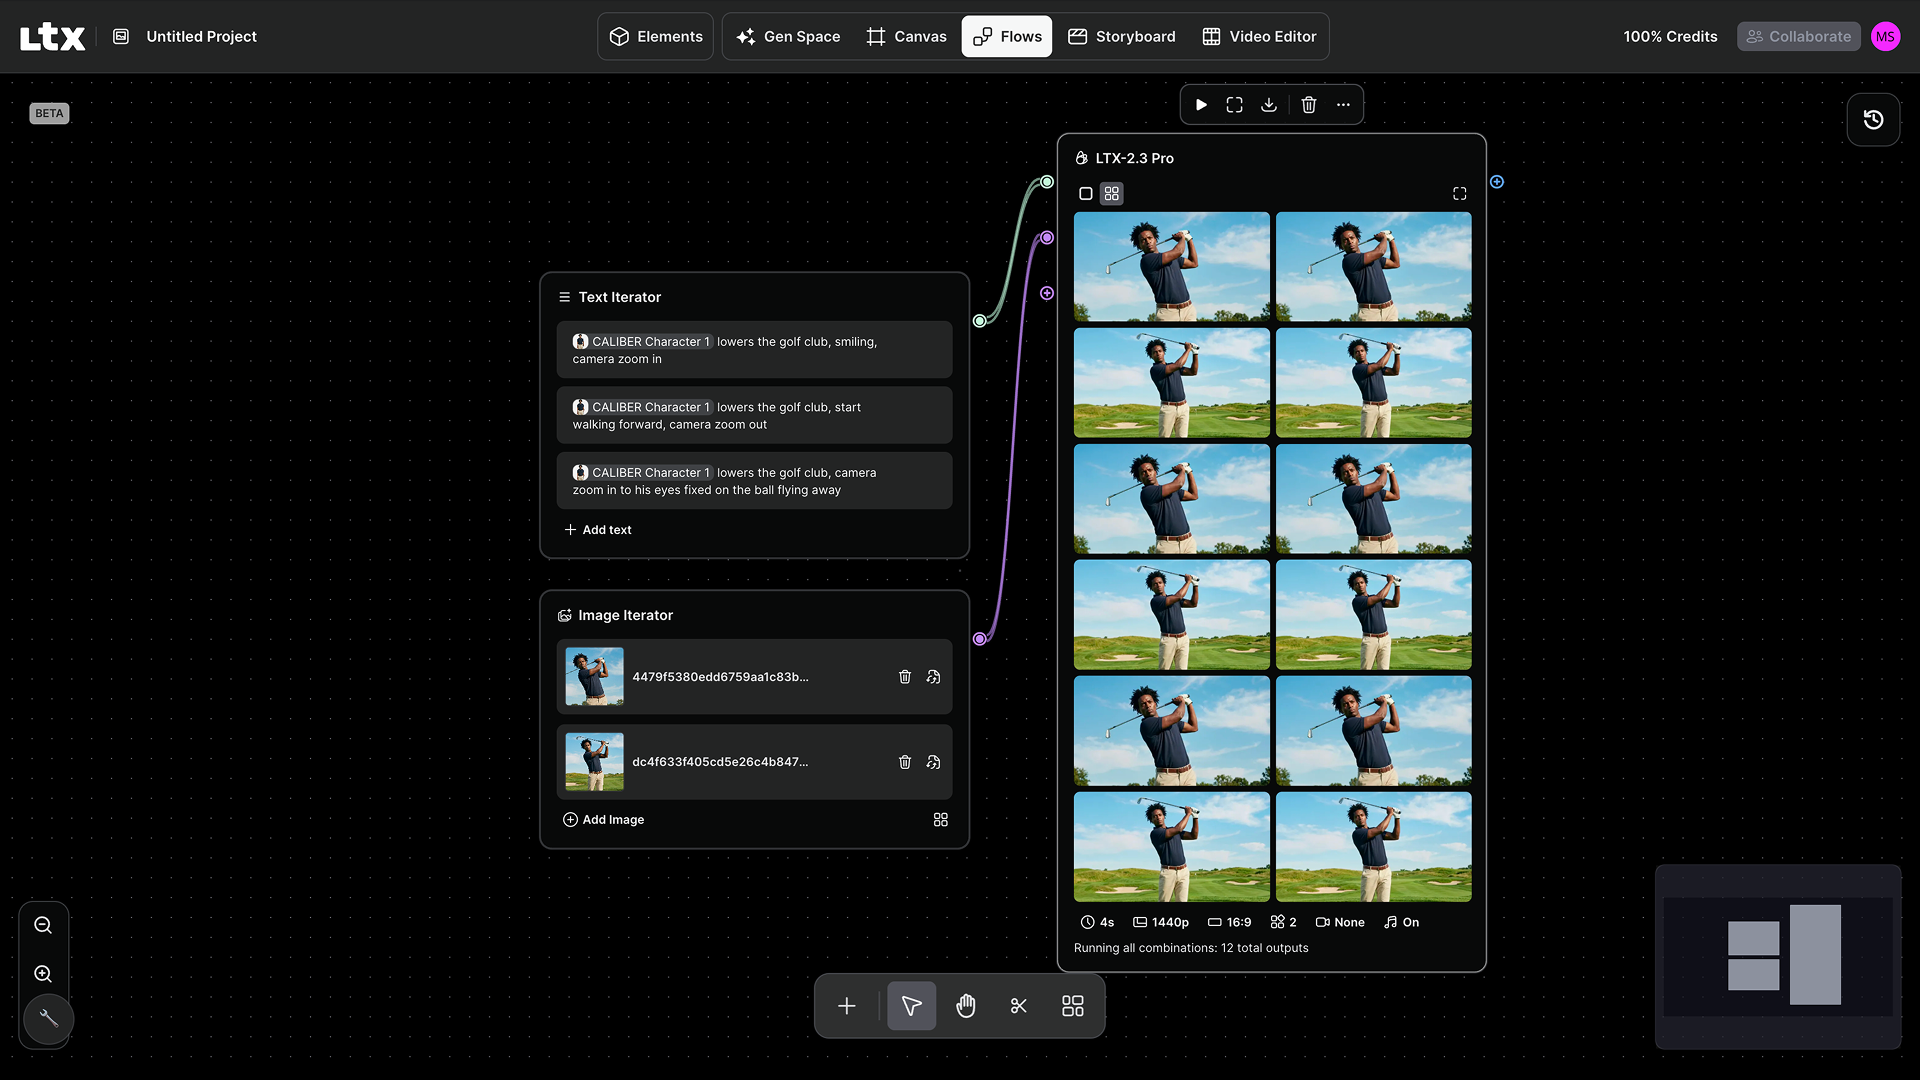
Swap your Text Prompt for a Prompt Iterator. Add all your prompt variations as rows — each becomes a separate batch item that flows through every downstream node.
Combine with an Image Iterator for cross-product batching: 3 prompts × 2 reference images × 2 outputs each = 12 generated assets in one run.
Flows is available on all plans. The creative direction is yours. The repetitive work is Flows.


Maximize your creative potential with AI-powered tools
Maximize your creative potential with AI-powered tools


.png)
.png)