When building a brand ad in a modern 3D animated style, the biggest challenge isn’t generating beautiful frames. It’s maintaining consistency. Without a strategy, the look starts to drift. Lighting shifts. Materials change. The tone slowly moves off-brand.
In this guide, we break down how we built a soft, stylized 3D brand ad inside LTX Studio using LTX-2.3 and Style Elements to lock the aesthetic and scale it across every shot.
Models Used
For this build, we used different models at different stages:
- Nano Banana Pro for style exploration and image generation
- LTX-2.3 Pro for higher quality hero shots
- LTX-2.3 Fast for dialogue, close-ups, and rapid iteration
1. Define the Look First
Before casting characters or building scenes, we defined the visual language. We started with a prompt describing:
- Soft, rounded 3D characters
- Clay-like matte materials
- Warm, diffused interior lighting
- Muted but rich color palette
- Clean, minimal environments

We iterated using NanoBananaPro until we landed on a style that felt right.
You can also upload a visual reference if you already have a strong aesthetic direction. That helps anchor lighting, material behavior, and tone even faster.
Once we settled on the look, we generated additional frames in the same style to test consistency across angles and compositions.
When we were confident the aesthetic held up, we saved it as a Style Element.
Now the look was locked.
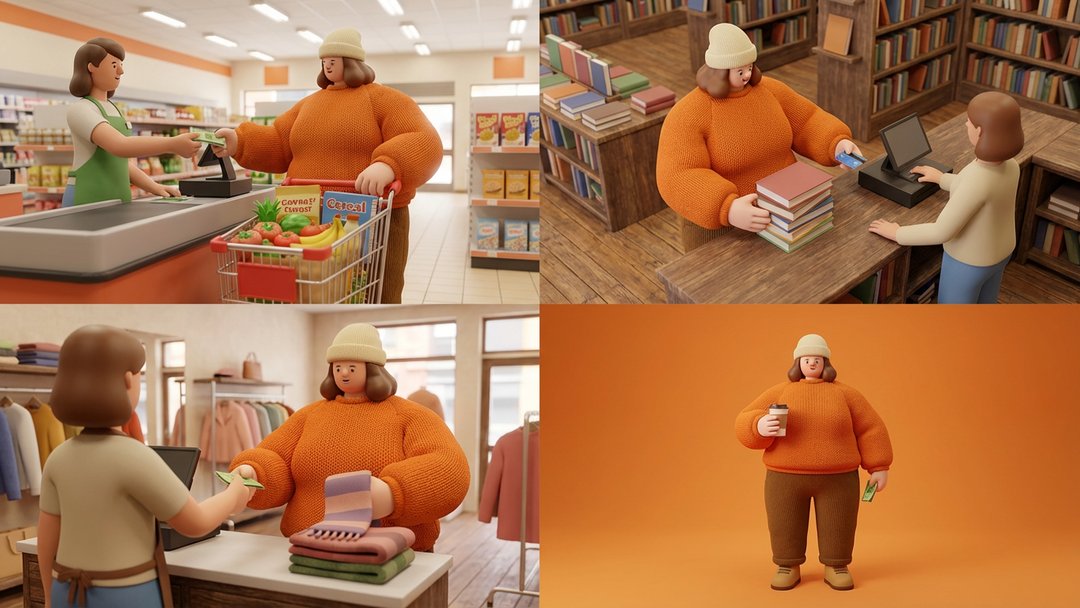
2. Cast the Character and Apply the Style
For casting, we prompted a character.
We applied the Style Element to perform a style transfer.
This allowed us to:
- Keep recognizable structure
- Maintain consistent proportions
- Ensure the character fits perfectly within the defined aesthetic
Once approved, we saved the character as a Character Element.
3. Create the Product and Save It as an Object
Next, we generated the product shots.

Using the same Style Element, we ensured the product matched the same material response, lighting softness, and overall tone as the characters. We combined the Style Element and the Character Element, giving us a master product shot.

Once we had a strong result, we saved it as an Object Element.
Now the product, character, and style were all aligned and reusable.
4. Build Out Shots with LTX-2.3
With all elements in place, we started building the ad.
For dialogue, reactions, and close-ups, we used LTX-2.3 Fast.
LTX-2.3 is ideal for:
- Close-ups and mid shots
- Dialogue and expression
- Animation and stylized scenes
5. Add Sound and Dialogue
To complete the scene, we added:
- Character dialogue
- Sound effects from the SFX pool
This helped bring the characters to life and made it easier to evaluate pacing and tone before export.
6. Lock the Brand System
At this point, everything lives inside your project:
- Style Element
- Character Element
- Object Element
To complete the brand identity, you can also define:
- Brand colors
- Typography
- Logo
7. Scale It with Brand Kits
If you want to reuse this across projects, you can create a Brand Kit.
This allows you to save:
- Your visual style
- Your characters
- Your products
- Your colors and fonts
The Brand Kit can be applied to any new project, ensuring that every ad starts from the same consistent foundation.
Instead of rebuilding your brand each time, you’re deploying it.
The Takeaway
By defining the style first and building everything on top of it, you create a consistent system that can be reused across projects.
- Define your visual style once
- Cast and lock your characters
- Create and standardize your product
- Align everything under one consistent look
- Save it all as reusable elements
- Package it into a Brand Kit for future use
Once your system is in place, every new ad starts from a consistent foundation.


Maximize your creative potential with AI-powered tools
Maximize your creative potential with AI-powered tools


.webp)
.png)