
Want to remove a distracting object from your photo, enhance a specific detail, or add something new without regenerating the entire image? With LTX’s Brush tool, you can make precise adjustments to any image, all while maintaining the integrity of the original look.
For designers, marketers, agencies, and creators, even the smallest visual inconsistency can disrupt a polished result. Traditionally, fixing these issues required complex image-editing tools or regenerating the whole image, which often produced unpredictable results.
Now, with Brush, small targeted edits are fast, intuitive, and precise. In this article, we’ll walk you through how to refine or update a specific part of your image step-by-step—whether you're removing unwanted objects, enhancing product details, or adding missing elements.
Why Make Targeted Edits to Images?
Image creation workflows often break down when a single small detail needs to be fixed. You might love the shot—but notice a distracting sign in the background, a misplaced shadow, or a product detail that needs adjustment. Full regeneration can change the entire image, forcing teams to continuously redo work and hope for a similar output.
Creators need speed and consistency. A tiny visual issue shouldn’t require starting over.
Use Cases Where Prompting Falls Short
While AI prompting is powerful for image generation, certain edits demand visual precision that text alone can't deliver. Prompting works beautifully for creating entire scenes, but struggles when you need surgical control over specific details:
- Selecting one object among many – When your image contains multiple similar elements—like several chairs in a room—prompting can't reliably target just one. Brush lets you isolate the exact chair you want to modify.
- Controlling angles and orientation – Describing the precise tilt, rotation, or angle of an object through text becomes overly complex. Visual selection is faster and more accurate.
- Placing elements with precision – Prompts struggle with exact spatial relationships. If you need an object positioned between two others or slightly behind something, showing is clearer than telling.
- Editing only part of an object – Want to adjust a sleeve without changing the entire shirt? Or refine a shadow without affecting the object casting it? Prompting typically modifies the whole element.
- Changing details in busy scenes – Crowded compositions make it nearly impossible to isolate specific elements through text. Brush lets you highlight a single person in a crowd or one detail in a complex background.
- Adjusting lighting in targeted areas – Refining shadows, highlights, or brightness in one region while preserving the rest requires visual precision that prompts can't provide.
- Making small but critical fixes – Removing a small obstruction, cleaning up an overlap, or fixing a minor visual issue often requires more precision than prompting allows.
Historically, precise edits demanded advanced tools or manual retouching skills. Even fixing a corner of an image could take significant time and technical proficiency. The Brush feature replaces those workflows with a simple, intuitive interface that lets you update only the area you want—no complicated masking, layering, or full-image regeneration.
How to Edit Part of an Image: A Step-by-Step Guide
LTX makes targeted image edits simple and intuitive. Here are two ways to start using the Brush tool:
Option 1: Editing an Image You Upload
Step 1: Upload Your Image to the Image Gen Space
Upload your image into the Image Gen space. Once it appears in your prompt box, hover over it.
Step 2: Hover and Select Brush
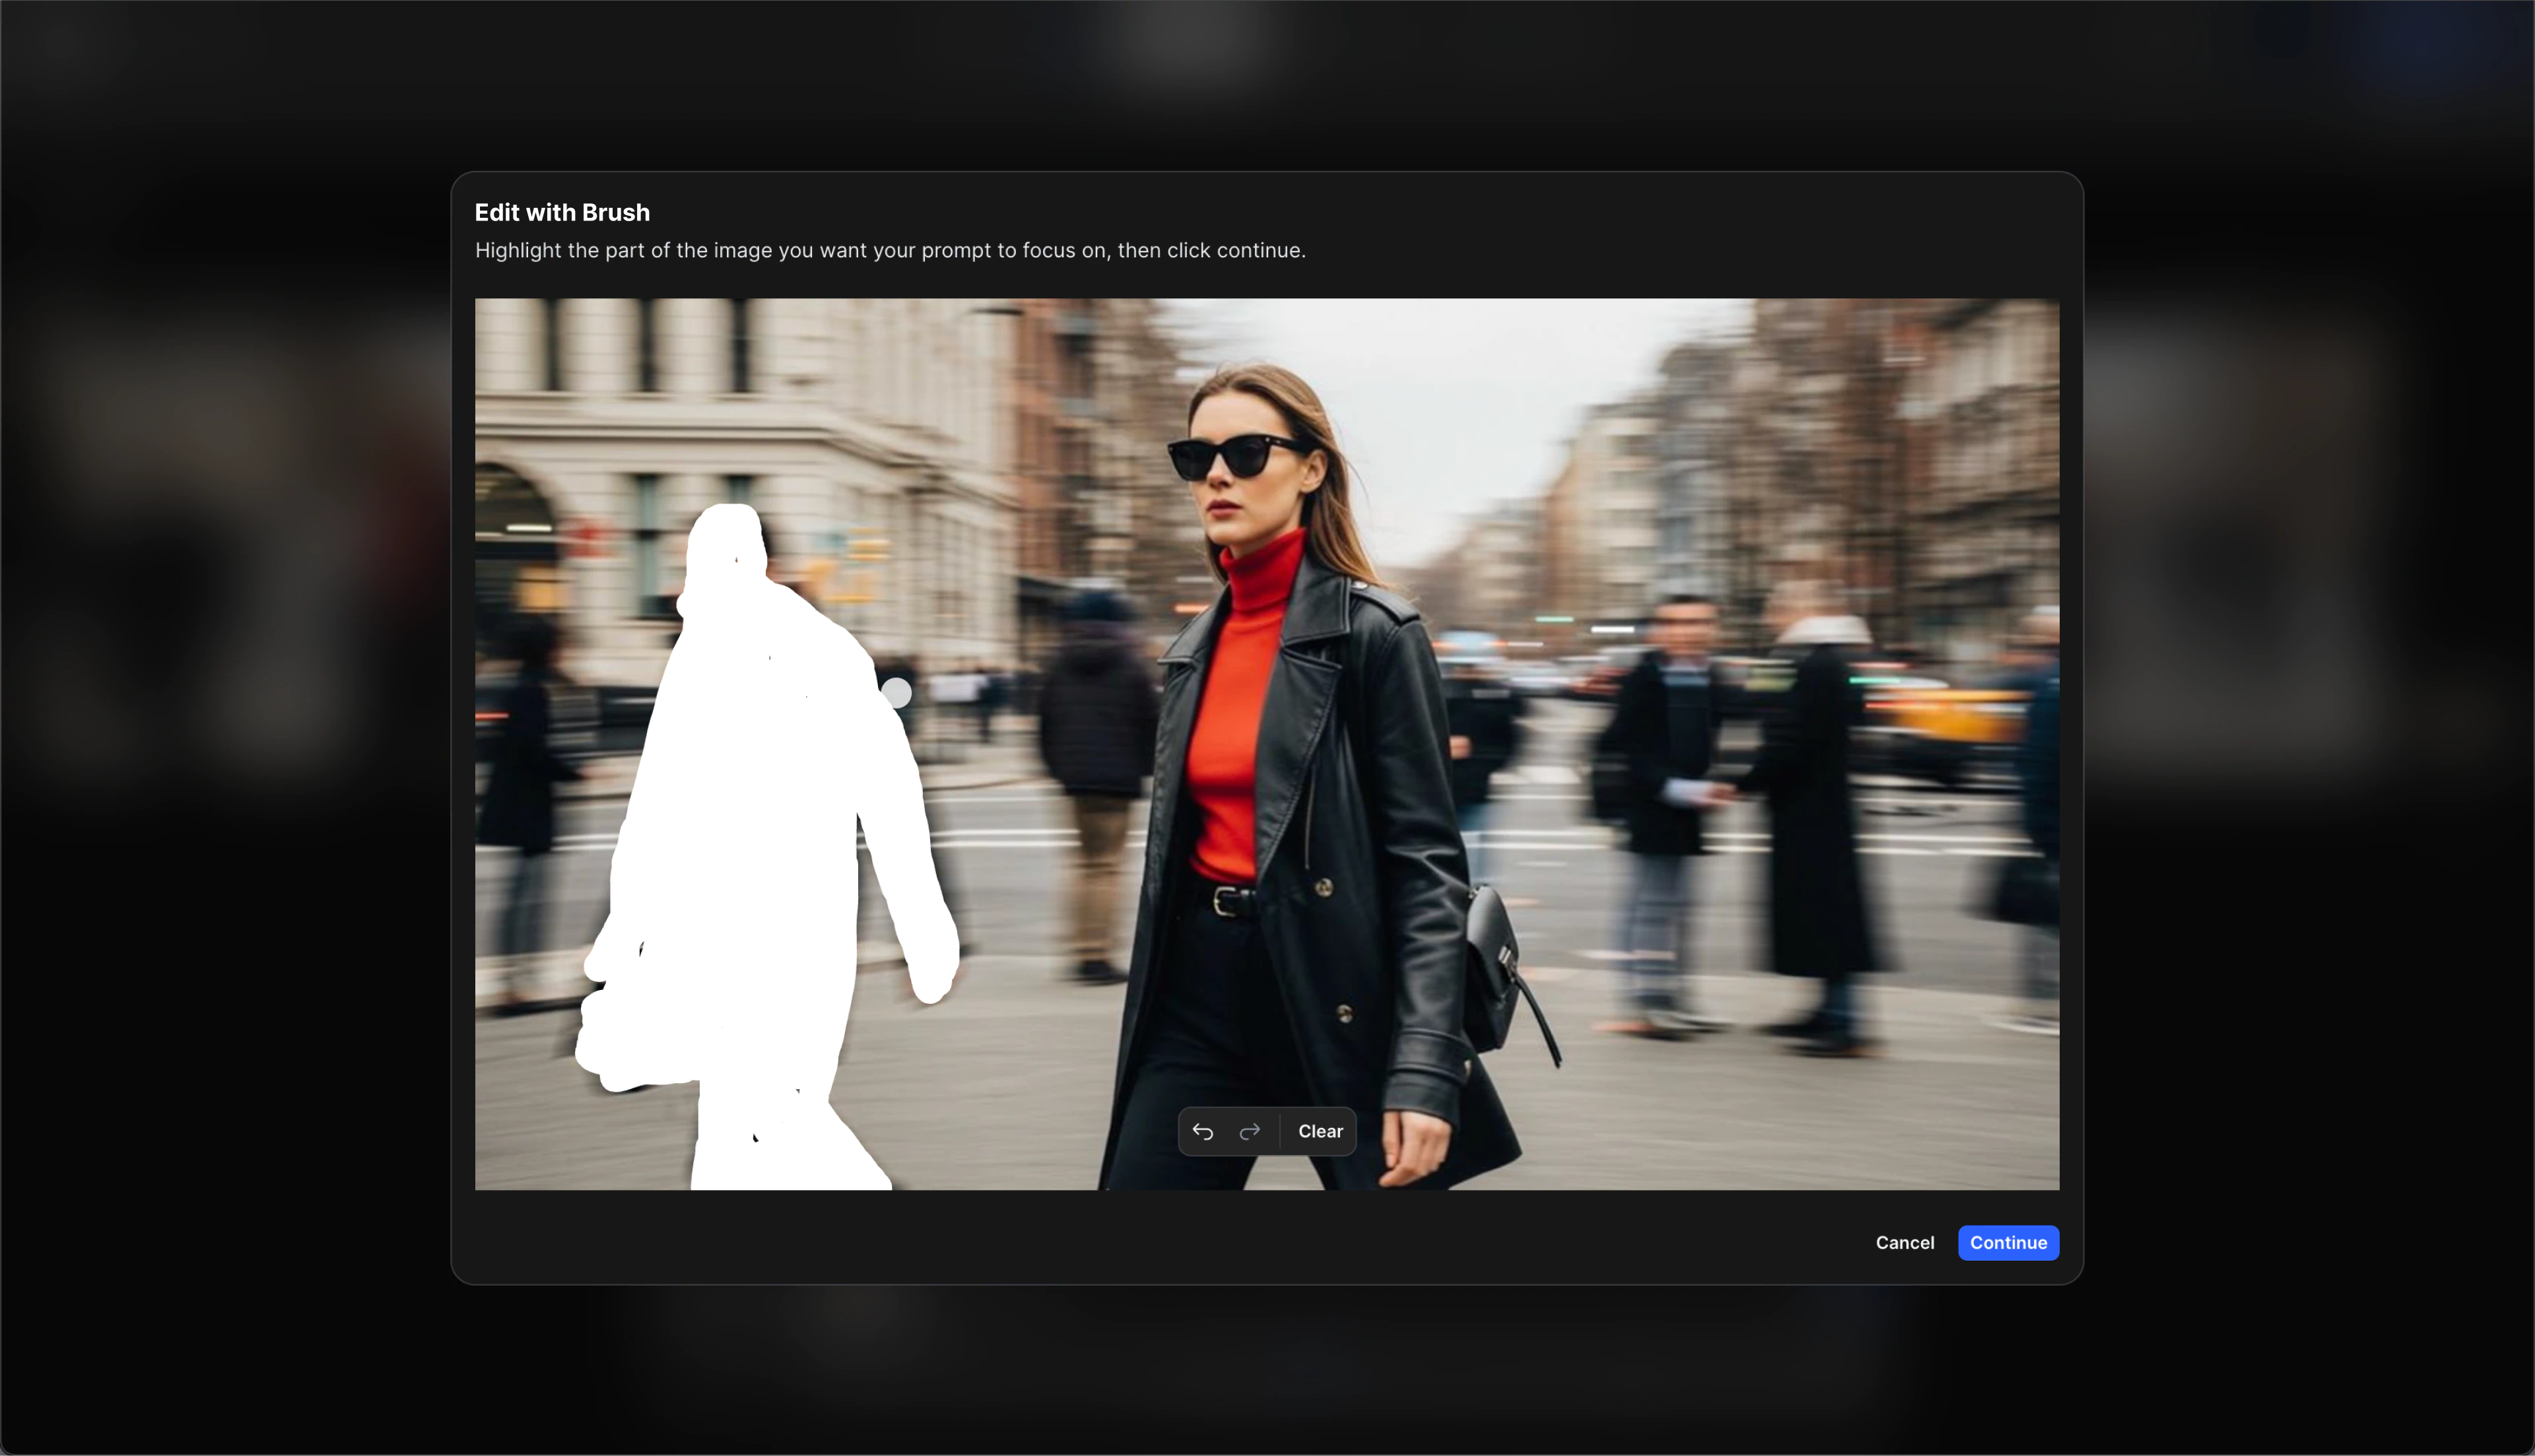
When you hover over the image, a small brush icon will appear with the label Brush. Click it to view the image in full-screen and activate the Brush tool.
Step 3: Highlight the Area You Want to Change
Use the brush to paint over the exact area you want to modify, whether you’re removing something, replacing it, or adding a new element.
Once you finish brushing, you’ll be taken back to the prompt box.
Step 4: Describe the Change in the Prompt
In the prompt box, describe what you want to update in the brushed area:
- “Remove the person in the background”
- “Replace the sign with a blank wall”
- “Add a blue mug”
Step 5: Click Generate
Click Generate to apply the update.
You’ll receive a new version of your image with only the selected area changed.
Option 2: Editing an Image You Already Created
Step 1: Hover Over the Image
Find the image you previously generated and hover over it.
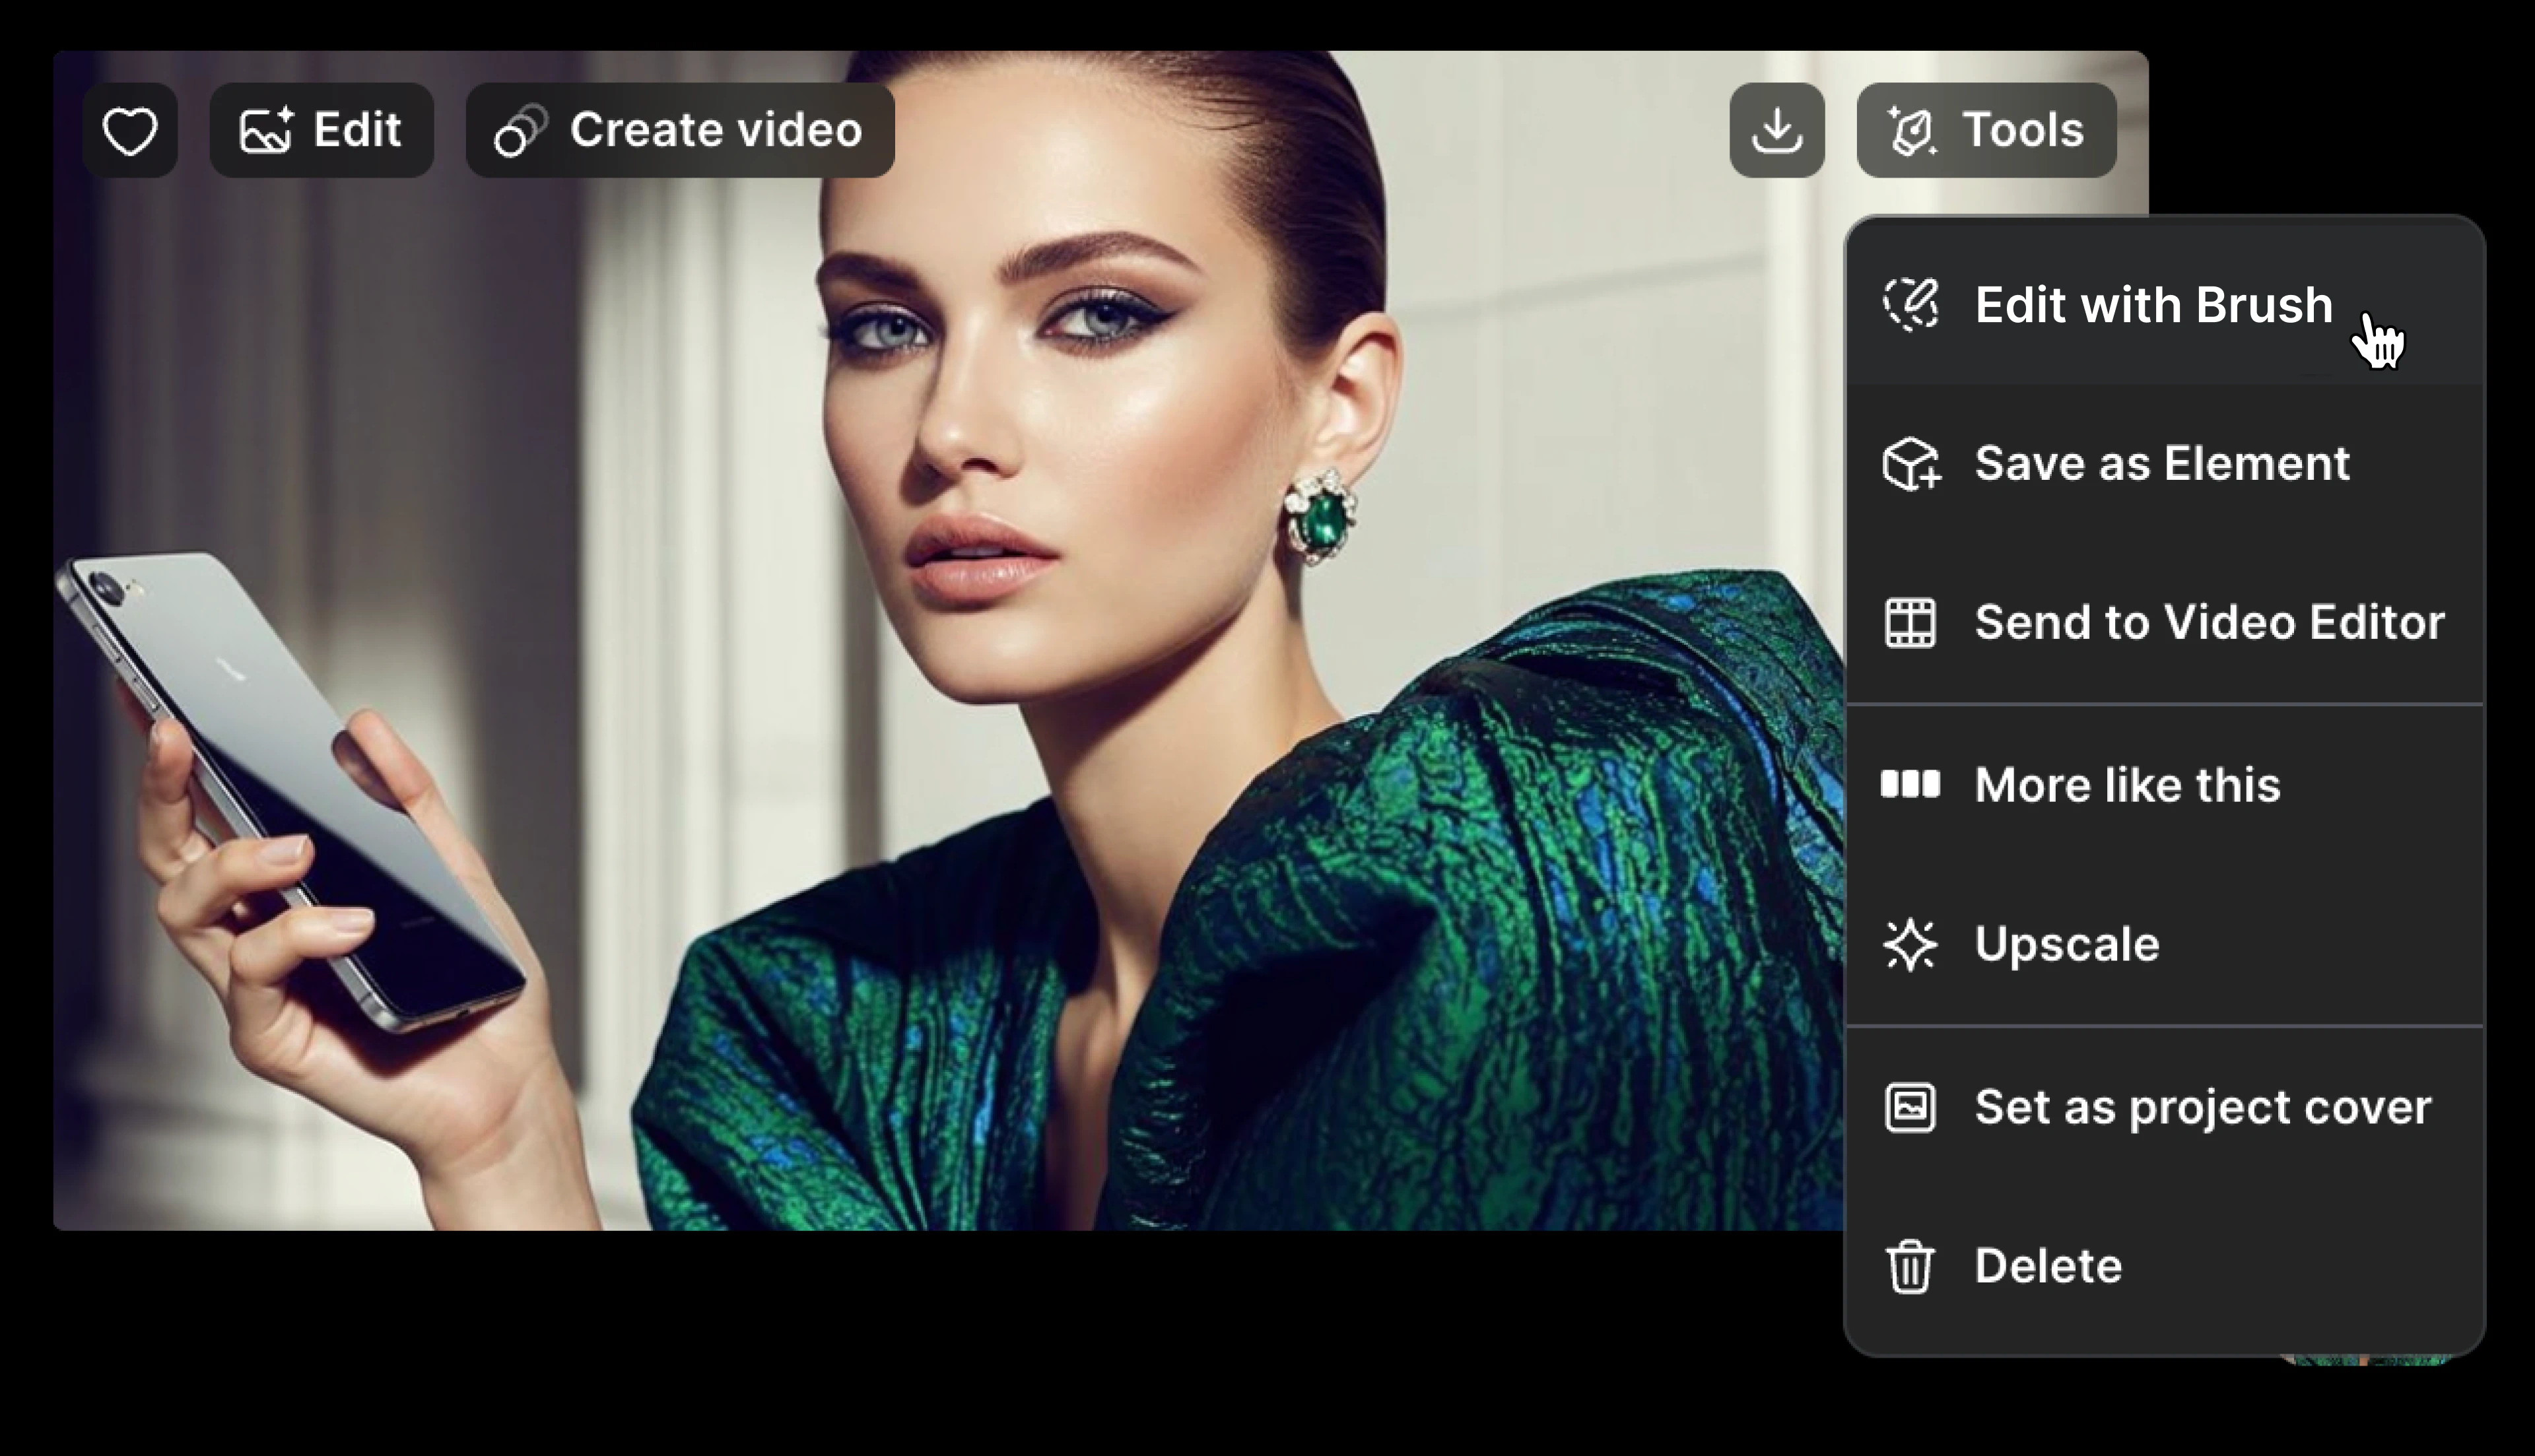
Step 2: Open the Brush Tool
Click the three dots on the right side of the image.
Select Edit with Brush from the dropdown.
The image will open in full-screen view with the brush tool activated.
Step 3: Highlight the Area You Want to Modify
Brush over the exact region you want to update.
Once you finish selecting the area, the prompt box will open automatically.
Step 4: Describe the Adjustment
Type the change you want to make - remove, replace, refine, or add any element.
Step 5: Click Generate
Press Generate to apply the update and instantly receive the updated version of your image.
Pro Tips for Cleaner Object Removal
While LTX’s remove object function is designed to deliver professional-quality results with minimal effort, applying these tips will ensure even better outcomes:
- Use Precise Selection: For detailed edits, zoom in on the object you’re removing to achieve precision and avoid unintended distortions.
- Blend Edits with Surroundings: When adding or replacing elements, reference nearby textures, lighting, or colors in your prompt to help the AI blend the update naturally into the image.
- Avoid Overloading the Prompt: Keep the prompt focused on one action at a time. Too many instructions can cause mixed or inconsistent outputs.
The Benefits of AI-Powered Precision Editing
AI-powered editing using the Brush tool reshapes how creators work with images. Instead of regenerating entire visuals or learning complex software, teams can update only the parts that matter.
Here’s how it transforms your workflow:
Efficiency & Time Savings
What used to require full-image re-renders—or even external editing tools, now takes seconds. Make changes instantly without disrupting the rest of your composition.
Cost-Effectiveness
Eliminate the need for multiple apps or professional retouching support. Brush offers professional-grade editing at no additional cost and across all pricing tiers.
Professional Results with Minimal Effort
Brush gives you studio-quality precision without needing design or Photoshop expertise. Whether you're refining a campaign asset or cleaning up a quick product shot, results remain consistent and on-brand.
Whether you’re part of an agency, an in-house creative team, or a solo designer, LTX’s Brush tool gives you unmatched control over your visuals. Instead of rebuilding entire images or compromising on quality, you can refine only what needs improvement—quickly, accurately, and intuitively.
Brush FAQs
What is the Brush tool used for?
To make precise edits to specific areas of an image - remove objects, add elements, or refine details, without regenerating the entire image.
Do I need professional editing skills to use Brush?
Not at all. Just highlight the area and describe the change. The AI handles the rest.
How is this different from full-image regeneration?
Brush updates only the selected area, preserving the original look and minimizing randomness, making it ideal for product shots, brand visuals, and campaigns.


Maximize your creative potential with AI-powered tools
Maximize your creative potential with AI-powered tools


.png)